
Help Subjects
Mail Login
Domain Setup
MailBox Properties
General Properties
AutoReply
Mailbox Business
Mailbox Home
Confirmation Screen
Report Screen
Error Screen
Logoff Screen
Catchall Mailbox
Netscape Users
Eudora Users
Mail Server Login Screen
Mailbox
Enter the name of the your mailbox (for example,
joe@abc.com).Password
Enter your mailbox password.
Domain Setup Page
If your privilege level is
Domain or higher, then you will be presented with the Domain Generalpage. The Domain Setup page looks like this:

The Domain General page has four tabs: General, Synonyms, Mailboxes and Mail Lists. You can use these four domain tabs to manage the properties of these objects in the domain. The General tab provides information about your email accounts. The Synonyms tab is used to deliver multiple domains into mailboxes in one domain. You can use the Mailboxes tab to add, delete and modify mailboxes in this domain.
To create a mailbox, enter a name in the
Name field, select the type of mailbox to create from the and click the Add button. A Report Page will be displayed describing the success or failure of the operation.
To delete a Mailbox, select its name in the list and click on the Delete button. A Confirm Page will be displayed describing the operation with OK and Cancel links.

To modify a mailbox, select its name from the list and click the Edit button. After the server has authorized the operation you will be presented with the properties page for this mailbox. See Mailbox Properties Page.
Mailbox Properties Page
This page allows you to change the properties of an individual mailbox. It contains four tabbed pages called General, Auto Reply, Business and Home.
Use this form to set the general properties for this mailbox.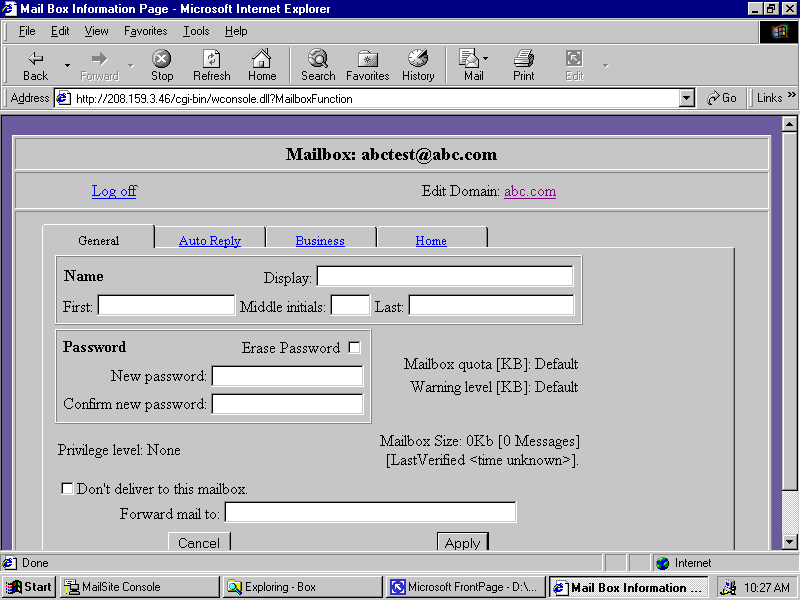
First
Enter the first name of the person who will use this mailbox.
Middle Initials
Enter the last name of the person who will use this mailbox.
Last
Enter the middle initials of the person who will use this mailbox.
Display
Enter the full name of the person who will use this mailbox. This field will be filled in automatically
if this is an NT or Database mailbox.
Password
You can change the password for this mailbox by entering a new value here. You must retype the
password in the confirmation field. Passwords are limited to 14 characters to maintain
consistency with the Windows NT limit.
Confirm Password
Re-enter the new password to confirm the change. Note that passwords are limited to 14 characters to
maintain consistency with the Windows NT limit.
Alias Address
Enter one or more alias addresses for the user. Mail received for any of these addresses will be
received just as if they were sent to the user's mailbox address.
Alternate Email
Enter the alternate e-mail address of the person who will use this mailbox.
Web Site
Enter the web site of the person who will use this mailbox.
Forward Mail To
Enter an Internet mail address to which messages for this user will be forwarded. Leave empty to
disable forwarding. You can enter a fully qualified Internet mail address, or if the destination address
is in the default MailSite domain, you can enter just the mailbox name. You can auto-forward to
multiple addresses by separating each address with a comma.
Don't Deliver to this Mailbox
Select this field to prevent any mail messages from being delivered to this mailbox. It is normally set
only if the
Forward To or the Auto Reply feature is being used.Mailbox AutoReply Page
Use this form to configure the auto-reply properties for this mailbox.
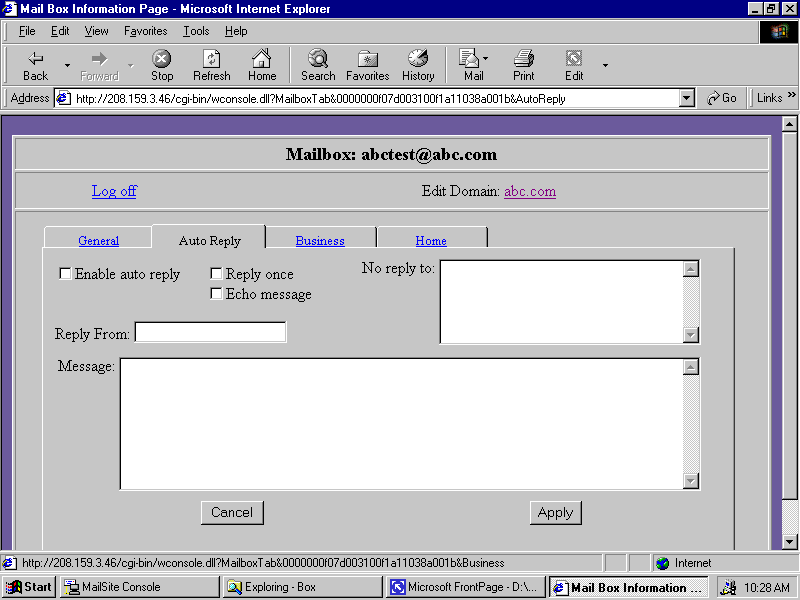
Enable Auto Reply
Select this field to enable the auto reply feature for this mailbox. Auto Reply causes MailSite to
automatically generate a reply message to the sender when an incoming e-mail arrives for this
mailbox.
Reply Just Once
Select this field to ensure that no sender receives more than one auto reply. When this is checked,
MailSite will append the e-mail address to which it replies to a file called
REPLIED.TXT thatlocated in the mailbox directory. It will delete this file if the auto reply feature is switched off.
Echo MessageSelect this field to return the original message with all auto-reply messages.
Reply From
Enter an e-mail address that MailSite will use as the
From: address when creating auto-replymessages.
No Reply To
Enter list of e-mail addresses (one per line) to which auto reply messages will not be sent. Hold the
Ctrl
key and press Return to enter multiple lines. If a message is received which is addressed orcopied to one of these addresses, then no automatic reply will be sent. You would typically include
addresses of mail lists in here, since automatic replies to mail list messages are antisocial. Note that
MailSite will never send an auto reply to an address like
owner-listname or like lisname-request,for the same reason.
Reply Message
Enter the text of the auto reply message. Hold the Ctrl key and press Return to enter multiple
lines. You may include auto reply directives to include files and special fields in your reply message.
Auto Reply Directives
The automatic reply message for a mailbox may contain directives that are replaced by other text
when the auto-reply message is actually sent. The full list of directives follows:
Directive Replacement text
%ADDRESS
The e-mail address of the person who sent the original message%DATE
The current date%TIME
The current time%% A single percent character
Mailbox Business Page
Use this form to set the business address for this mailbox.
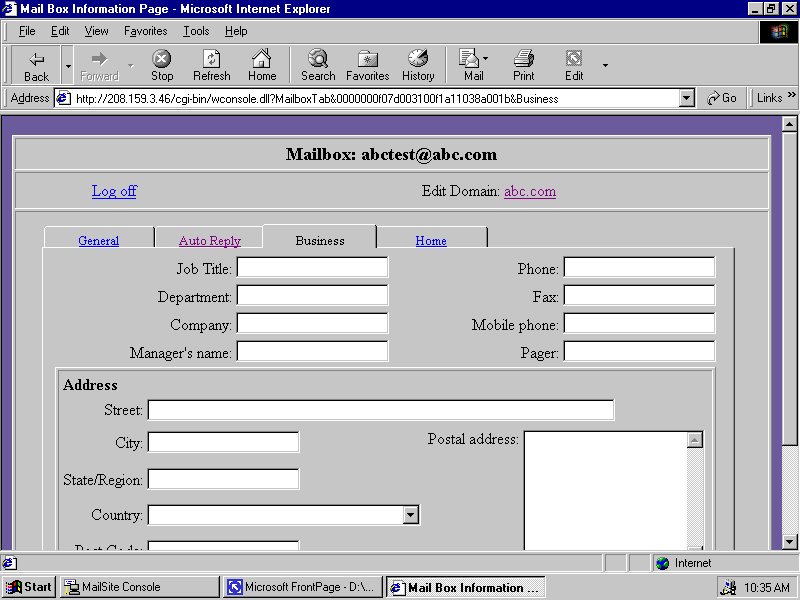
Job Title
Enter the job title of the person who will use this mailbox.
Department
Enter the department of the person who will use this mailbox.
Company
Enter the company of the person who will use this mailbox.
Manager’s Name
Enter the name of the manager of the person who will use this mailbox.
Phone
Enter the business phone number of the person who will use this mailbox.
Fax
Enter the business fax number of the person who will use this mailbox.
Mobile Phone
Enter the mobile phone number of the person who will use this mailbox.
Pager
Enter the pager number of the person who will use this mailbox.
Street
Enter the business street address of the person who will use this mailbox.
City
Enter the business city address of the person who will use this mailbox.
State/Region
Enter the business state address or region of the person who will use this mailbox.
Zip/Post Code
Enter the business zip or post code address of the person who will use this mailbox.
Country
Enter the business country address of the person who will use this mailbox.
Mailbox Postal Address Page
Use this form to set the postal address for this mailbox. Use this form if the mailbox user’s address does not conform to the standard structure of the Business or Personal page. Hold the Ctrl key and press Return to enter multiple lines.
Mailbox Home Page
Use this form to set the home address for this mailbox.
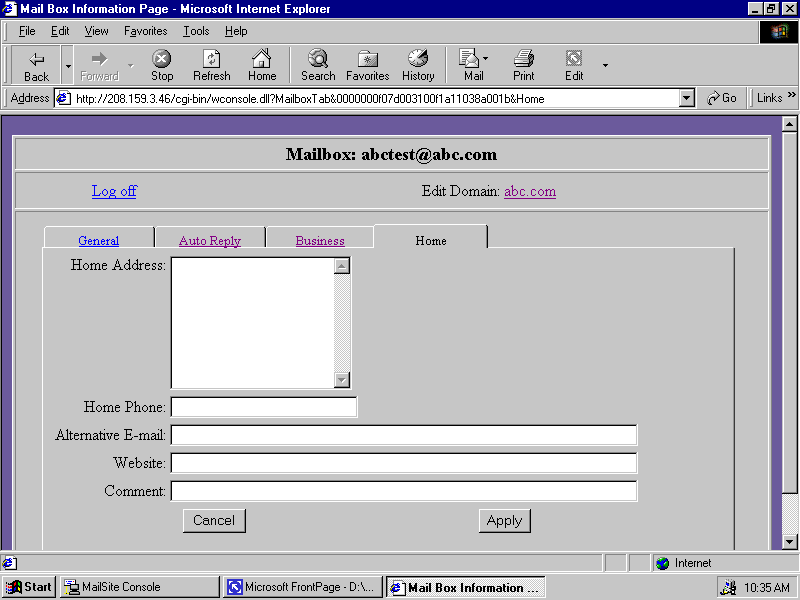
Street
Enter the home street address of the person who will use this mailbox.
City
Enter the home city address of the person who will use this mailbox.
State/Region
Enter the home state address or region of the person who will use this mailbox.
Zip/Post Code
Enter the home zip or post code address of the person who will use this mailbox.
Country
Enter the home country address of the person who will use this mailbox.
Home Phone
Enter the home phone number of the person who will use this mailbox.
Comment
Enter notes or comments for the person who will use this mailbox.
Privilege Level
The options available in the privilege level box will depend on your privilege:
Þ
If you have Server privilege, then you may change any mailbox's privilege level, even that of a mailbox with Server privilege.Þ
If you have Domain privilege, then you may change a mailbox's privilege level to Domain or None.Þ
If you have privilege level of None then you may not change your privilege level.Mailbox Quota and Warning Level
You can only change these settings if you have Server privilege. If you are not permitted to change these values, they will still be displayed, but cannot be changed.
Confirm Page
The Confirm Page is displayed before any object is deleted. It looks like this:
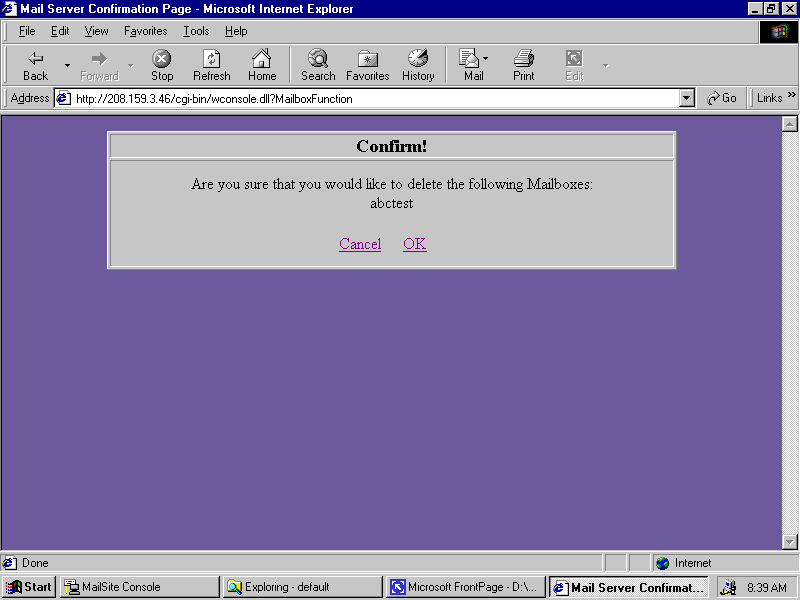
The Confirm Page describes the action that has been requested and has two links to OK or Cancel the action. Click on OK to complete the action.
Report Page
The Report Page displays the result of an operation. It looks like this:
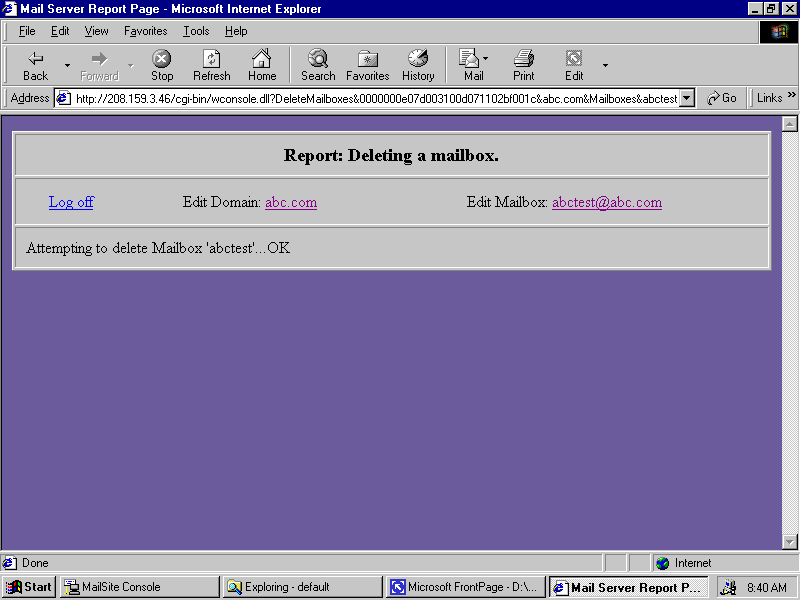
After you have performed an update operation a Report Page will describe the success or failure of each of the changes requested. The page contains at most four links to the server, domain and mailbox pages and a log off link. Your privilege level and the current state of the Web Console session determine which links are available.
Error Page
The Error Page looks like this:
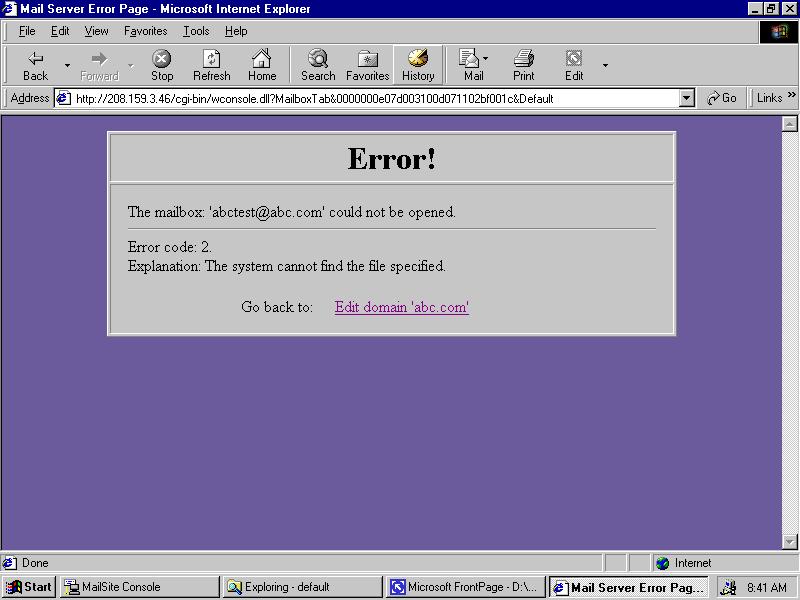
Should an error occur during a Web Console session then an error page will be displayed outlining the nature of the error and a link back to a suitable point.
Logoff Page
The Logoff page looks like this:
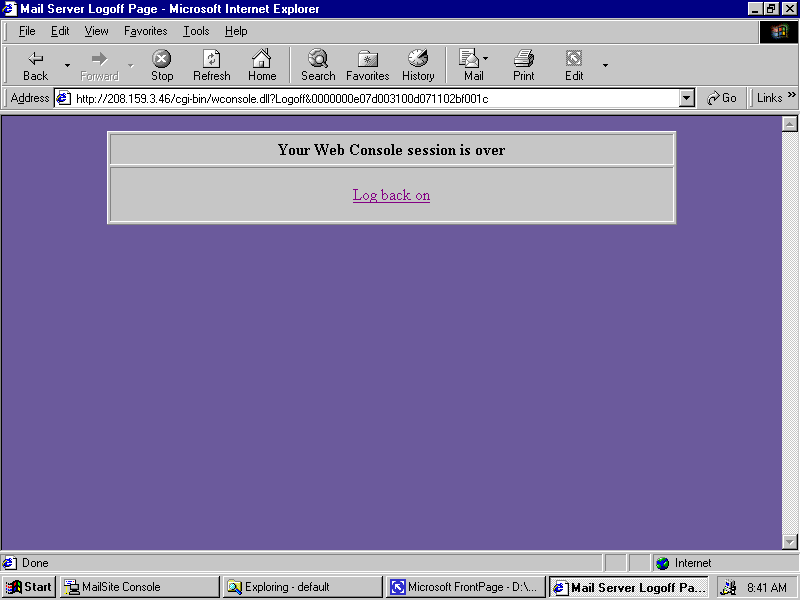
When you select the logoff link this page is displayed. It cleans up the memory on the server side of the Web Console application and also provides a link back to the logon page. Note that if there is no activity on a mailbox managing session for one hour then the session is terminated by the server.
However, for security reasons, it is a good idea always to log off.Catchall Mailbox
The mailbox name catchall is special. If the catchall mailbox exists in the domain abc.com, then incoming mail addressed to a non-existent mailbox such as unknown@abc.com will instead be delivered to the catchall@abc.com mailbox. If the catchall mailbox does not exist, the message will be returned to the sender of the mail.
Netscape User Configuration
Use the % instead of @ in the username field. Example: abcdemo%abc.com
Eudora User Configuration
Some Eudora Users may require the use the % instead of @ in the username field as well as the server name. Example: abcdemo%abc.com@mail.abc.com .